ในบทความนี้ เราจะสำรวจวิธีการสร้าง Agent แบบ Model Context Protocol (MCP) ที่ขับเคลื่อนด้วย AI ซึ่งสามารถช่วยผู้ใช้ในการใช้งานเว็บเบราว์เซอร์เพื่อทำภารกิจให้สำเร็จ หรือสร้างปริมาณการใช้งานเครือข่ายตามคำสั่งภาษาของมนุษย์ สิ่งนี้ทำได้โดยใช้ไลบรารี browser-use ที่มีประสิทธิภาพ ร่วมกับบริการโมดูล DeepSeek LLM ที่กำหนดค่าใน Local/LAN
เราจะแนะนำทีละขั้นตอนในการตั้งค่า Ollama DeepSeek-R1 Service ในสภาพแวดล้อม LAN ภายใน เชื่อมโยงกับ MCP Agent และผสานรวมกับการทำงานอัตโนมัติของเบราว์เซอร์ เนื่องจากโมเดล DeepSeek ทำงานในเครื่อง คุณจึงไม่ต้องกังวลเกี่ยวกับปัญหา "deepseek service busy" และค่าธรรมเนียมโทเค็น นอกจากนี้ การตั้งค่านี้ยังช่วยให้สามารถทดสอบโมเดลต่างๆ หรือรวมเวอร์ชัน DeepSeek ที่ปรับแต่งเองเพื่อเปรียบเทียบประสิทธิภาพของโมเดลต่างๆ ได้
บทความนี้จะครอบคลุมหัวข้อต่อไปนี้:
-
Agent Test Scenario Introduction – ภาพรวมของกรณีการใช้งานพร้อมการสาธิต
-
Agent Operation Detailed Design – บทนำทางเทคนิคเกี่ยวกับวิธีการที่ MCP Agent โต้ตอบกับเบราว์เซอร์
-
Test Environment Setup – การกำหนดค่าบริการ DeepSeek ในเครื่องและโมดูลการโต้ตอบกับเบราว์เซอร์
-
Test Result Summary and Conclusion – การประเมินประสิทธิภาพ ข้อมูลเชิงลึก และการปรับปรุงที่อาจเกิดขึ้น
# Created:     2025/03/08
# version:     v_0.0.1
# Copyright:   Copyright (c) 2025 LiuYuancheng
# License:     MIT License
MCP Agent Task Scenarios
เพื่อแสดงให้เห็นถึงความสามารถของ MCP Agent เราจะประเมินประสิทธิภาพผ่านสถานการณ์งานสองสถานการณ์ ในแต่ละกรณี Agent จะได้รับสตริงอินพุตภาษาของมนุษย์ และโต้ตอบกับเว็บเบราว์เซอร์โดยอัตโนมัติเพื่อดึงข้อมูลที่เกี่ยวข้องและสรุปข้อมูล ผลลัพธ์สุดท้ายคือไฟล์สรุปข้อความที่กระชับ
Scenario 1: General Information Search & Summarization
ในสถานการณ์นี้ Agent จะทำการ web search รวบรวมเนื้อหาที่เกี่ยวข้อง และสร้างสรุปที่มีโครงสร้าง
Human Language Input string:
Use google search 'deepseek', go to its web and summarize the web contents in 300 words.
Agent Operation: Agent จะเริ่มต้นการสืบค้นการค้นหา แยกรายละเอียดที่สำคัญจากแหล่งข้อมูลหลายแห่ง และรวบรวมสรุป วิดีโอสาธิตแสดงอยู่ด้านล่าง:
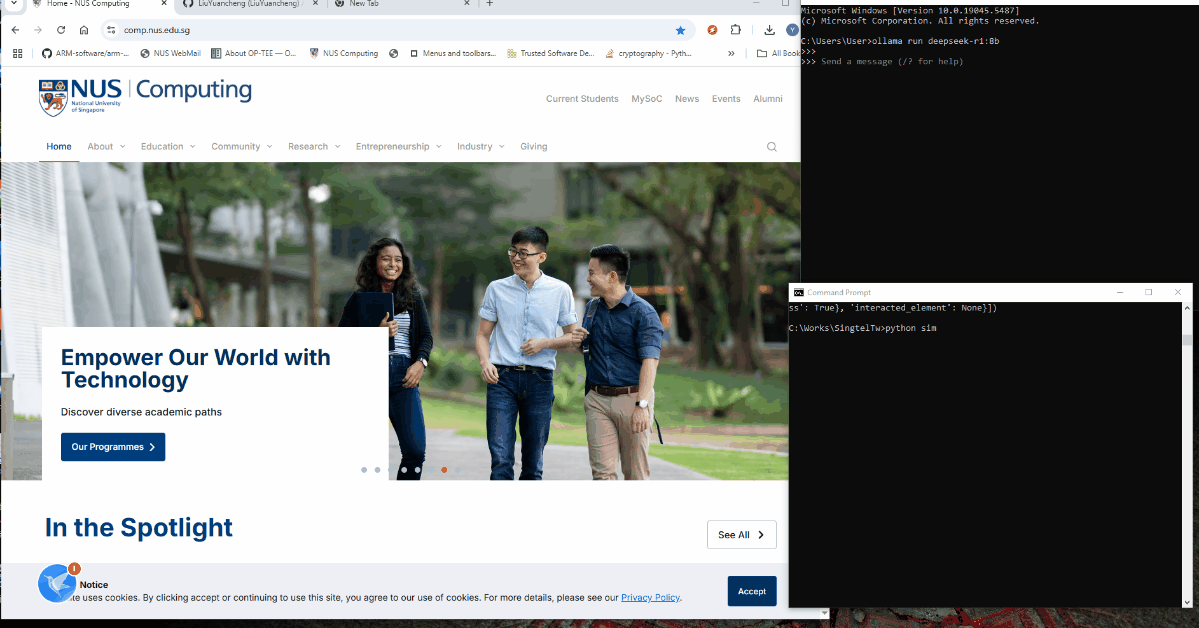
Figure-01: Scenario 1: General Information Search & Summarization record, version v_0.0.1 (2025)
Scenario 2: Targeted Web Content Extraction & Summarization
ในที่นี้ Agent ได้รับมอบหมายให้เยี่ยมชมเว็บไซต์เฉพาะหรือที่เก็บโปรเจ็กต์ แยกรายละเอียดที่สำคัญ (เช่น ไฟล์ README) และสรุปเนื้อหา
Human Language Input string:
Find the project “Deepseek_Local_LATA,” open the README file, and summarize the project in 100 words.
Agent Operation: Agent จะค้นหาที่เก็บ แยกเนื้อหา README และสร้างสรุปที่กระชับ วิดีโอสาธิตแสดงอยู่ด้านล่าง:
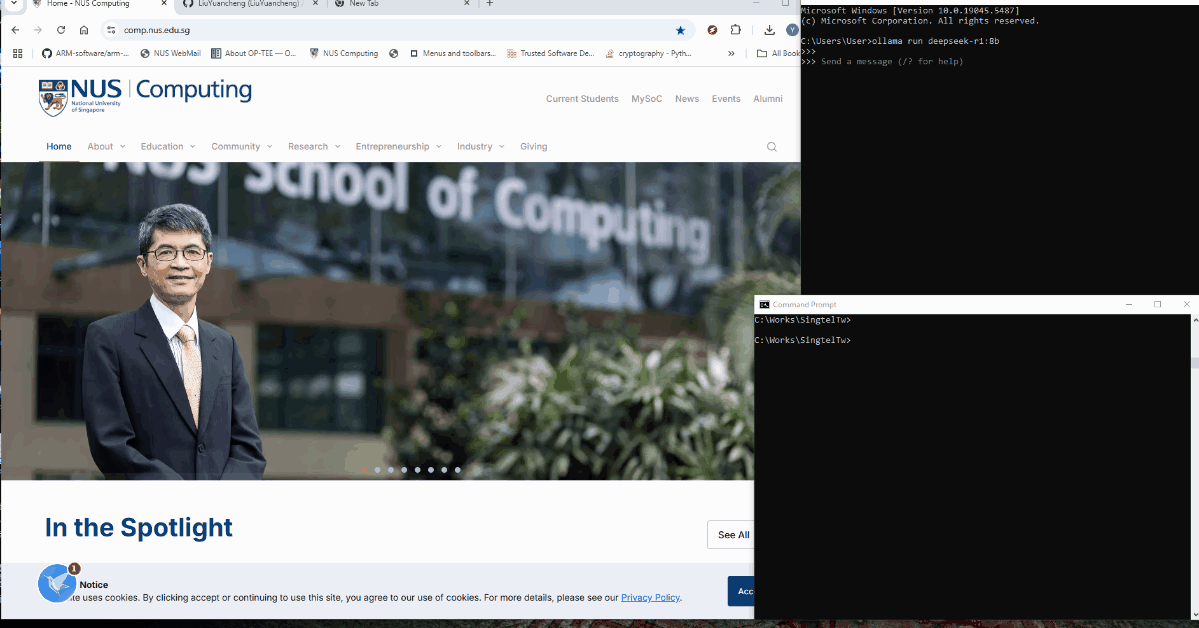
Figure-02: Scenario 2: Targeted Web Content Extraction & Summarization record, version v_0.0.1 (2025)
สถานการณ์เหล่านี้แสดงให้เห็นว่า MCP Agent สามารถนำทางเว็บ ดึงข้อมูลที่เกี่ยวข้อง และให้สรุปที่มีโครงสร้างได้อย่างไร ทั้งหมดนี้ขับเคลื่อนโดย local/LAN DeepSeek AI processing เพื่อประสิทธิภาพและการควบคุม
MCP Agent Operation Detailed Design
ก่อนที่จะเจาะลึกการออกแบบโดยละเอียดของ Agent เรามาแนะนำความรู้พื้นฐานเกี่ยวกับ Model Context Protocol (MCP) ก่อน MCP เป็นมาตรฐานเปิดที่ช่วยให้การเชื่อมต่อที่ปลอดภัยและเป็นมาตรฐานระหว่างผู้ช่วย AI และแหล่งข้อมูลต่างๆ ช่วยให้ Large Language Models (LLMs) สามารถเข้าถึงเครื่องมือและชุดข้อมูลได้โดยตรง ปรับปรุงความสามารถในการดึงและประมวลผลข้อมูล
Background: Model Context Protocol (MCP)
ในสถาปัตยกรรม MCP MCP Servers ทำหน้าที่เป็นโปรแกรมขนาดเล็กที่เปิดเผยฟังก์ชันการทำงานเฉพาะผ่านโปรโตคอลที่เป็นมาตรฐาน MCP Service ทำหน้าที่เป็นเลเยอร์กลาง เชื่อมต่อแอปพลิเคชันหรือเครื่องมือกับบริการ LLM บริการเหล่านี้รวมถึง MCP Agents ต่างๆ ซึ่งแต่ละ Agent จะมีเครื่องมือ ทรัพยากร และเทมเพลตพร้อมท์ที่ช่วยให้เกิดการโต้ตอบแบบไดนามิกระหว่างระบบ AI และไคลเอนต์
สำหรับโปรเจ็กต์นี้ เราพัฒนา MCP Agent อย่างง่ายที่โต้ตอบกับเว็บเบราว์เซอร์ workflow ของ Agent นี้แสดงอยู่ด้านล่าง:
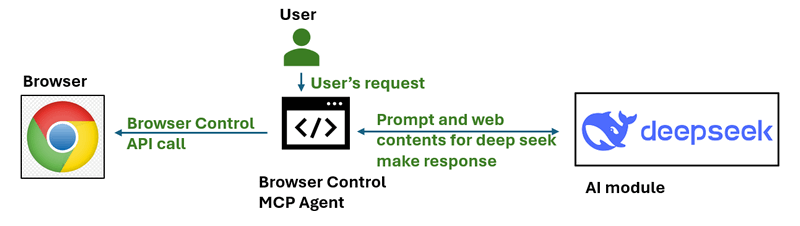
Figure-03: simple workflow diagram of browser control MCP agent, version v_0.0.1 (2025)
ด้วยการจัดการทรัพยากรด้วยรูปแบบการเข้าถึงตาม URI และการสนับสนุนการเจรจาต่อรองความสามารถ MCP Servers มีบทบาทสำคัญในการขยายฟังก์ชันการทำงานของระบบ AI ช่วยให้สามารถดำเนินการหรือดึงข้อมูลได้อย่างปลอดภัยและมีประสิทธิภาพ
Agent Workflow Overview
workflow ของ Agent นั้นง่ายมากดังที่แสดงด้านล่าง และทำงานในสามขั้นตอนหลัก:
-
Step 1: Add Scenario Prompt & Generate a To-Do List.
-
Step 2: Interact with the Browser and analyze the page contents.
-
Step 3: Generate the Final Summary/Result and verify tasks finished.

Figure-04: detailed workflow diagram of browser control MCP agent, version v_0.0.1 (2025)
Step 1: Add Scenario Prompt & Generate a To-Do List
Agent เริ่มต้นด้วยการแก้ไขคำขออินพุตของผู้ใช้ให้เป็น To-Do list ที่มีโครงสร้าง ขั้นตอนนี้ช่วยให้มั่นใจได้ว่า Agent เข้าใจวิธีการดำเนินการตามงานที่ร้องขออย่างเป็นระบบ ด้านล่างนี้คือตัวอย่างพร้อมท์ที่เราเพิ่มก่อนคำขอของผู้ใช้:
Prompt: I am an AI agent program can simulate human actions as a beginner user to use browser, please create the TO-DO steps need to be simulated for the task:
เมื่อสตริงอินพุตของผู้ใช้ Google search DeepSeek and summarize the product features in 300 words คำขอที่ Agent ส่งไปยัง AI จะถูกแก้ไขเป็นเนื้อหาด้านล่าง:
# Input to deepseekR1:8b model
Prompt: I am an AI agent program can simulate human actions as a beginner user to use browser, please create the TO-DO steps need to be simulated for the task: Using Google search to find DeepSeek and summarize its product features in 300 words.
The output should exactly follow the JSON format below:
{
"initURL":"",
"tasksList":[
"1. ",
"2. ",
"3. ",
"4. ",
...
]
}
จากนั้นเราส่งคำขอไปยัง Deepseek เพื่อรับรายการสิ่งที่ต้องทำด้านล่าง:
# Output from deepseekR1:8b model
initURL = "https://www.google.com/"
tasksList = [
    "1. Type in for 'deepseek' in the Google page's search bar",
    "2. Click the first search result",
    "3. Select the first deepseek link in the google search result page"
    "4. Base on the web content in the link, summarize the contents in 300 words"
]
Step 2: Agent Interact with the Host's Browser
เมื่อ To-Do list ถูกสร้างขึ้น Agent จะดำเนินการตามขั้นตอนโดยอัตโนมัติโดยใช้ไลบรารี Playwright และโมดูลการโต้ตอบ browser-use:
-
Open the initial URL given by deepseek-r1:8b model (Google search page).
-
Perform sequential actions from the To-Do list (e.g., typing, clicking, navigating).
-
Analyze the current webpage’s content using browser-use and decide whether it satisfies the step requirements.
-
Continue to the next step until all tasks are completed.
แต่ละขั้นตอนจะได้รับการประเมินเทียบกับการวิเคราะห์หน้าเว็บแบบเรียลไทม์เพื่อให้แน่ใจว่ามีการดำเนินการที่ถูกต้อง หากไม่สามารถทำตามขั้นตอนได้ Agent จะพยายามแก้ไขหรือบันทึกข้อผิดพลาด
Reference:
-
Playwright : https://github.com/microsoft/playwright
-
Browser-Use: https://github.com/browser-use/browser-use
Step3: Generate the Result Summary
เมื่อทำตามงานทั้งหมดใน To-Do list เสร็จสิ้น เนื้อหาที่แยกออกมาจะถูกส่งไปยัง DeepSeek LLM เพื่อสรุป The Final Verification Prompt Sent to LLM:
The result content is: .
Can this content fulfill the user's goal to Google search DeepSeek and summarize its product features in 300 words?
ผลลัพธ์สุดท้ายประกอบด้วย:
-
The extracted content summary.
-
DeepSeek’s verification of result accuracy.
-
Archived test results for further evaluation.
Agent นี้สามารถขยายเพิ่มเติมเพื่อรองรับโมเดล AI บนคลาวด์หรือในเครื่องที่แตกต่างกัน การทำงานอัตโนมัติของเบราว์เซอร์ที่กำหนดเอง และงานการให้เหตุผลหลายขั้นตอนตามสถานการณ์ที่ผู้ใช้กำหนด
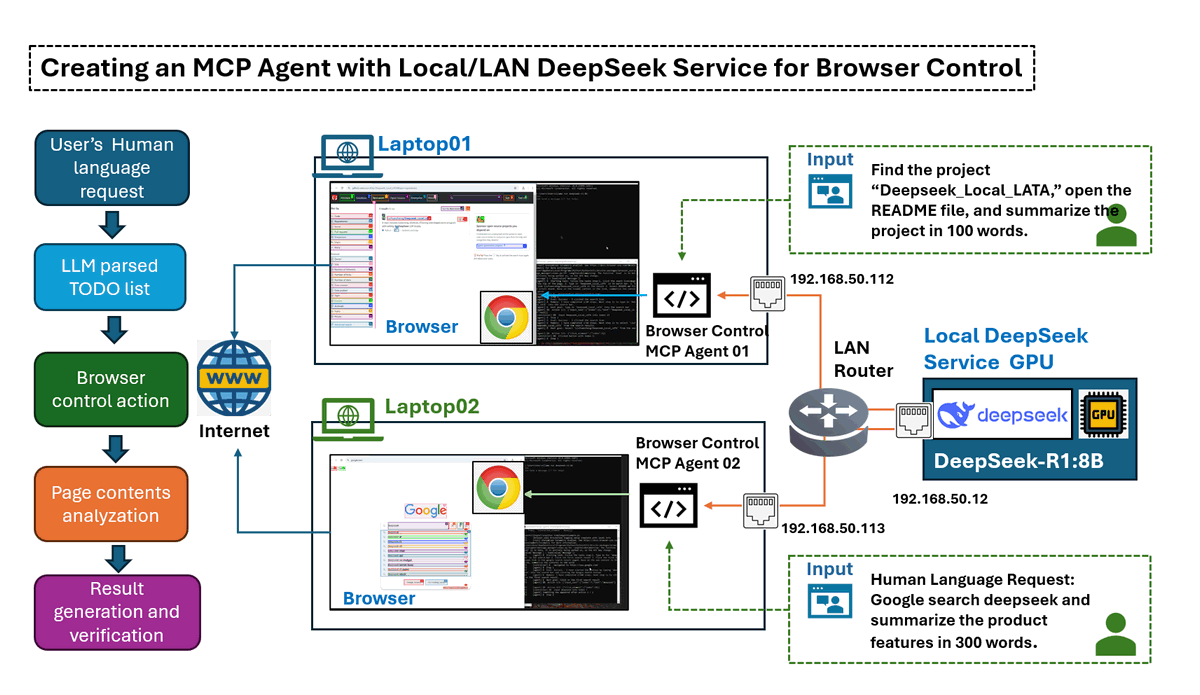
Environment Introduction and Setup
Environment Over View
ในการตั้งค่าสภาพแวดล้อมการทดสอบนี้ เราได้กำหนดค่า Local Area Network (LAN) ที่มีเครื่องจักรอย่างน้อยสองประเภท:
-
A GPU-powered server hosting the DeepSeek service.
-
Multiple standard laptops running browser control agents.
AI agent จะรับผิดชอบในการ controlling browsers บนแล็ปท็อป และโทโพโลยีเครือข่ายแสดงอยู่ด้านล่าง:
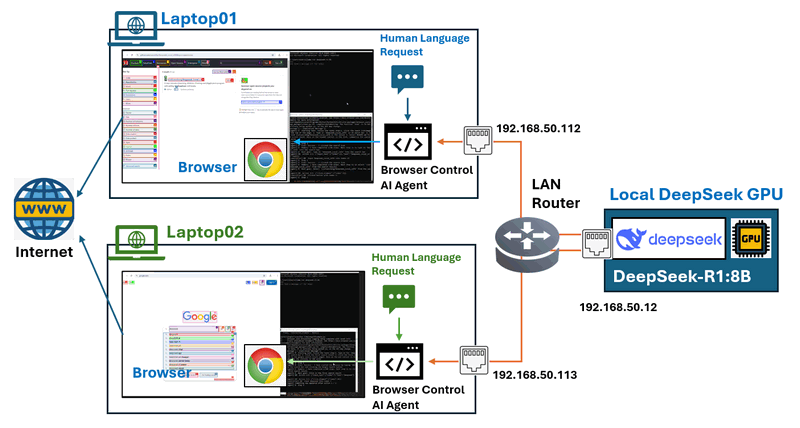
Figure-05: Test environment network connection configuration, version v_0.0.1 (2025)
ในการสร้างสภาพแวดล้อมนี้ เราต้องทำการตั้งค่าต่อไปนี้ และการกำหนดค่าแสดงอยู่ด้านล่าง:
-
Deploy the DeepSeek service on the GPU server.
-
Install and configure browser control agents on the laptops.
| VM name | IP address | Hardware spec | OS | Program | Human Language Requests |
|---|---|---|---|---|---|
| Local GPU server | 192.168.50.12 | Intel-i5, 32GB, RTX-3060 | Windows- 11 | Ollama [deepseek-r1:8b] | N.A |
| Laptop01 | 192.168.50.112 | Intel-i5, 16GB, RTX-1060 | Windows- 11 | Browser Control Agent | Google search deepseek and summarize the product features in 300 words. |
| Laptop02 | 192.168.50.113 | Intel-i5, 16GB, Intel UHD GPU | Windows- 11 | Browser Control Agent | Find the project "Deepseek_Local_LATA" and open the readme file, summarize the project in 100 words. |
Setting Up the DeepSeek Service on the GPU Node
The GPU server needs to run DeepSeek-R using Ollama and expose the service connection to LAN nodes.
Step 1 : Install Ollama LLM Service
Download Ollama from the official site: https://ollama.com/download and select the appropriate package for your OS and install it.
Step 2 Download and Run DeepSeek-R
Since our GPU server has an RTX 3060 (12GB), we use the 8B model. Run the following command to download and launch DeepSeek-R1:8b model :
ollama run deepseek-r1:8b
To check the biggest deepseek model your GPU node can run, you can refer to this link: https://www.linkedin.com/pulse/deploying-deepseek-r1-locally-custom-rag-knowledge-data-yuancheng-liu-uzxwc
Step 3: Expose DeepSeek Service to LAN
Setting environment variables on Mac
If Ollama is run as a macOS application, environment variables should be set using launchctl:
-
For each environment variable, call
launchctl setenv.
launchctl setenv OLLAMA_HOST "0.0.0.0:11434"
-
Restart Ollama application.
Setting environment variables on Linux
If Ollama is run as a systemd service, environment variables should be set using systemctl:
-
Edit the systemd service by calling
systemctl edit ollama.service. This will open an editor. -
For each environment variable, add a line
Environmentunder section[Service]:[Service]
Environment="OLLAMA_HOST=0.0.0.0:11434" -
Save and exit.
-
Reload
systemdand restart Ollama:systemctl daemon-reload
systemctl restart ollama
Setting environment variables on Windows
On Windows, Ollama inherits your user and system environment variables.
-
First Quit Ollama by clicking on it in the task bar.
-
Start the Settings (Windows 11) or Control Panel (Windows 10) application and search for environment variables.
-
Click on Edit environment variables for your account.
-
Edit or create a new variable for your user account for
OLLAMA_HOST, set its value to0.0.0.0 -
Click OK/Apply to save.
-
Start the Ollama application from the Windows Start menu.
Reference : https://github.com/ollama/ollama/blob/main/docs/faq.md#how-do-i-configure-ollama-server
Configure the Agent on Operation Node
Node the GPU node is ready, we need to configure each operation node laptop. The operation node requires: A modern web browser , Python 3.11 or higher, Required and Python libraries installed.
Step 1 : Install Required Python Libraries
Install Ollama and LangChain support:
pip install ollama
pip install langchain-ollama
Install the browser-use automation library:
pip install browser-use
Install Playwright for browser control:
playwright install
Step 2: Configure Agent Parameters
Each laptop runs a browser control agent that interacts with DeepSeek, download the file dsBrowserCtrlAgent.py , dsBrowserCtrlConfig.txt and ConfigLoader.py to the operation node.
Set up the deepseek service configuration dsBrowserCtrlConfig.txt based on the GPU node and the model running:
# This is the config file template for the module
# Setup the parameters with below format (every line follow : format, the
# key can not be changed):
#-----------------------------------------------------------------------------
# GPU node IP address which provide the ollama service.
OLLAMA_HOST_IP:192.168.50.12
#-----------------------------------------------------------------------------
# The deepseek model name we want to use.
DP_MODEL_NAME:deepseek-r1:8b
#-----------------------------------------------------------------------------
# The deepseek CTX number name we want to use, # for deepseek-r1:7b and 8b use
# 6000, for higher model use 32000
NUM_CTX:6000
Then add the request to the USER_REQUEST parameter as shown below then start:
#-----------------------------------------------------------------------------
# the user request string such as Use google search 'deepseek', go to its web
# and summarize the web contents in 100 words
USER_REQUEST:Use google search 'deepseek', go to its web and summarize the web contents in 100 words
Step 3: Run the MCP Agent
Then execute the agent with below command and collect the result.
python dsBrowserCtrlAgent.py
The agent will Connect to the GPU server which running DeepSeek-R1, perform browser interactions (e.g., searching, clicking, summarizing) and return the processed output based on the request.
Code link: https://github.com/LiuYuancheng/Deepseek_Local_LATA/tree/main/Application/BrowserAgent
Test Result Summary and Conclusion
During the evaluation, we tested four different DeepSeek model sizes to analyze their impact on task completion and execution speed. The test involved executing a series of browser-based tasks, including searching for a specific project, selecting relevant links, reading content, and summarizing information.
Below is a tasks result of the scenario 2:
| Function \ Deepseek model | deepseek-r1:1.5b | deepseek-r1:7b | deepseek-r1:8b | deepseek-r1:14b |
|---|---|---|---|---|
| Generate Todo List | Finished | Finished | Finished | Finished |
| 1. Click the search icon(magnifier) at the top of the page. | Finished | Finished | Finished | Finished |
| 2. Type in 'Deepseek_Local_LATA' in th search bar. | Failed | Finished | Finished | Finished |
| 3. Select the link Deepseek_Local_LATA in the result | Failed | Finished | Finished | Finished |
| 4. Select README.md file link and scroll down | Failed | Failed | Finished | Finished |
| 5. Base on the readme content in the link, summarize the contents in 100 words | Failed | Failed | Finished | Finished |
During the test, there are some observation:
-
Basic Task Completion: All models, including the smallest (1.5B), successfully performed simple actions such as generating a to-do list and clicking the search icon.
-
Search and Navigation: Models below 7B struggled with executing keyword searches and selecting relevant links.
-
Content Processing: A minimum of 8B was required to read and summarize a README file effectively.
-
Performance Scaling: The 14B model demonstrated superior performance, completing all tasks without failure and ensuring better execution speed and accuracy.
สรุป :
ผลการทดสอบเน้นว่าขนาดของโมเดลมีผลกระทบอย่างมากต่ออัตราความสำเร็จของงานและประสิทธิภาพในการดำเนินการ โมเดล 8B เป็นตัวเลือกที่ใช้งานได้ขั้นต่ำสำหรับงานเรียกดูพื้นฐาน ในขณะที่โมเดลที่ใหญ่กว่า 14B ขอแนะนำสำหรับการจัดการกระบวนการที่ซับซ้อนและมีหลายขั้นตอนด้วยความแม่นยำและความน่าเชื่อถือที่สูงขึ้น
การออกแบบนี้ช่วยให้มั่นใจได้ถึงแนวทางที่มีโครงสร้าง อัตโนมัติ และแม่นยำในการดำเนินการงานที่ใช้เบราว์เซอร์โดยใช้เอเจนต์ AI ที่ขับเคลื่อนด้วย MCP ด้วยการผสานรวมการประมวลผล DeepSeek LLM ในเครื่อง ผู้ใช้จะได้รับประโยชน์จาก:
-
เวลาแฝงที่ต่ำกว่า เมื่อเทียบกับโซลูชันบนคลาวด์
-
ประสิทธิภาพด้านต้นทุน โดยการลดการพึ่งพา APIs ภายนอก
-
ความยืดหยุ่นในการปรับแต่ง สำหรับระบบอัตโนมัติที่ขับเคลื่อนด้วย AI ที่ปรับให้เหมาะสม
สำหรับผู้ใช้ที่ต้องการ ความแม่นยำที่สูงขึ้นและการดำเนินการที่แข็งแกร่ง ขอแนะนำให้ลงทุนใน โมเดล DeepSeek ที่ใหญ่ขึ้น (14B ขึ้นไป) เพื่อเพิ่มประสิทธิภาพและความน่าเชื่อถือสูงสุดในระบบอัตโนมัติของงานเบราว์เซอร์ที่ขับเคลื่อนด้วย AI
- ลิงก์ไปยัง Project GitHub Repo: https://github.com/LiuYuancheng/Deepseek_Local_LATA
- หากคุณสนใจเกี่ยวกับการปรับใช้และการทดสอบ Deepseek-R1 ในเครื่องอื่นๆ โปรดดูที่:
- Deepseek test 01 : https://www.linkedin.com/pulse/deploying-deepseek-r1-locally-custom-rag-knowledge-data-yuancheng-liu-uzxwc
- Deepseek test 02 : https://www.linkedin.com/pulse/use-simple-web-wrapper-share-local-deep-seek-r1-model-yuancheng-liu-n7p6c
ขอขอบคุณที่สละเวลาตรวจสอบรายละเอียดบทความ หากคุณมีคำถามและข้อเสนอแนะ หรือพบข้อผิดพลาดของโปรแกรม โปรดส่งข้อความถึงฉันได้เลย ขอบคุณมากหากคุณสามารถแสดงความคิดเห็นและแบ่งปันคำแนะนำในการปรับปรุง เพื่อให้เราสามารถปรับปรุงงานของเราให้ดีขึ้นได้ ~
แก้ไขล่าสุดโดย LiuYuancheng ([email protected]) เมื่อวันที่ 18/03/2025 หากคุณมีปัญหาใดๆ โปรดส่งข้อความถึงฉัน