在本文中,我们将探讨如何构建一个 AI 驱动的 Model Context Protocol (MCP) 代理,该代理可以帮助用户操作 Web 浏览器,以根据人类语言指令完成任务或生成网络流量。这是通过强大的 browser-use 库与本地/局域网配置的 DeepSeek LLM 模块服务相结合来实现的。
我们将逐步介绍如何在本地局域网环境中设置 Ollama DeepSeek-R1 Service,将其与 MCP 代理连接,并与浏览器自动化集成。由于 DeepSeek 模型在本地运行,因此您无需担心“deepseek 服务繁忙”的问题和 token 费用。此外,此设置允许测试各种模型或包括自定义微调的 DeepSeek 版本,以比较不同模型的性能。
本文将涵盖以下部分:
-
Agent Test Scenario Introduction – 概述演示的用例。
-
Agent Operation Detailed Design – MCP 代理如何与浏览器交互的技术介绍。
-
Test Environment Setup – 配置本地 DeepSeek 服务和浏览器交互模块。
-
Test Result Summary and Conclusion – 评估性能、见解和潜在改进。
# Created:     2025/03/08
# version:     v_0.0.1
# Copyright:   Copyright (c) 2025 LiuYuancheng
# License:     MIT License
MCP Agent Task Scenarios
为了演示 MCP 代理的功能,我们通过两个任务场景评估其性能。在每种情况下,代理都会收到人类语言输入字符串,并自主地与 Web 浏览器交互,以检索和总结相关信息。最终输出是一个简洁的文本摘要文件。
Scenario 1: General Information Search & Summarization
在此场景中,代理执行网络搜索,收集相关内容,并生成结构化摘要。
Human Language Input string:
Use google search 'deepseek', go to its web and summarize the web contents in 300 words.
Agent Operation: 代理启动搜索查询,从多个来源提取关键细节,并编译摘要。演示视频如下所示:
Figure-01: Scenario 1: General Information Search & Summarization record, version v_0.0.1 (2025)
Scenario 2: Targeted Web Content Extraction & Summarization
在这里,代理的任务是访问特定的网站或项目存储库,提取关键细节(例如,README 文件),并总结内容。
Human Language Input string:
Find the project “Deepseek_Local_LATA,” open the README file, and summarize the project in 100 words.
Agent Operation: 代理找到存储库,提取 README 内容,并生成简洁的摘要。演示视频如下所示:
Figure-02: Scenario 2: Targeted Web Content Extraction & Summarization record, version v_0.0.1 (2025)
这些场景展示了 MCP 代理如何自主地浏览 Web,检索相关信息,并提供结构化摘要——所有这些都由本地/局域网 DeepSeek AI 处理提供支持,以实现效率和控制。
MCP Agent Operation Detailed Design
在深入研究代理的详细设计之前,让我们首先介绍一些关于 Model Context Protocol (MCP) 的背景知识。MCP 是一种开放标准,可实现 AI 助手和各种数据源之间的安全和标准化连接。它允许大型语言模型 (LLM) 直接访问工具和数据集,从而提高它们检索和处理信息的能力。
Background: Model Context Protocol (MCP)
在 MCP 架构中,MCP Servers 充当轻量级程序,通过标准化协议公开特定功能。MCP Service 充当中间层,将应用程序或工具与 LLM 服务连接起来。这些服务包括各种 MCP Agents,每个代理都提供工具、资源和提示模板,从而实现 AI 系统和客户端之间的动态交互。
对于此项目,我们开发了一个简单的 MCP Agent,它可以与 Web 浏览器交互。此代理的工作流程如下所示:
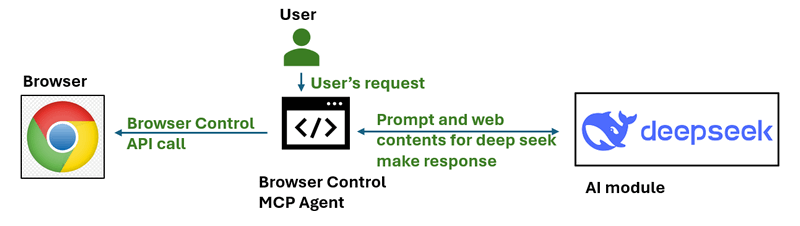
Figure-03: simple workflow diagram of browser control MCP agent, version v_0.0.1 (2025)
通过使用基于 URI 的访问模式管理资源并支持功能协商,MCP Servers 在扩展 AI 系统功能方面发挥着关键作用,从而使它们能够安全有效地执行操作或检索信息。
Agent Workflow Overview
代理工作流程非常简单,如下所示,它分三个主要步骤进行操作:
-
Step 1: Add Scenario Prompt & Generate a To-Do List.
-
Step 2: Interact with the Browser and analyze the page contents.
-
Step 3: Generate the Final Summary/Result and verify tasks finished.

Figure-04: detailed workflow diagram of browser control MCP agent, version v_0.0.1 (2025)
Step 1: Add Scenario Prompt & Generate a To-Do List
代理首先将用户的输入请求修改为结构化的 To-Do list。此步骤确保代理了解如何系统地执行请求的任务。以下是我们在用户请求之前附加的示例提示:
Prompt: I am an AI agent program can simulate human actions as a beginner user to use browser, please create the TO-DO steps need to be simulated for the task:
当用户输入字符串 Google search DeepSeek and summarize the product features in 300 words 时,发送给 AI 的请求代理将被修改为以下内容:
# Input to deepseekR1:8b model
Prompt: I am an AI agent program can simulate human actions as a beginner user to use browser, please create the TO-DO steps need to be simulated for the task: Using Google search to find DeepSeek and summarize its product features in 300 words.
The output should exactly follow the JSON format below:
{
"initURL":"",
"tasksList":[
"1. ",
"2. ",
"3. ",
"4. ",
...
]
}
然后,我们将请求发送到 Deepseek 以获取以下 ToDo 列表:
# Output from deepseekR1:8b model
initURL = "https://www.google.com/"
tasksList = [
    "1. Type in for 'deepseek' in the Google page's search bar",
    "2. Click the first search result",
    "3. Select the first deepseek link in the google search result page"
    "4. Base on the web content in the link, summarize the contents in 300 words"
]
Step 2: Agent Interact with the Host's Browser
生成 To-Do list 后,代理使用 Playwright 库和 browser-use 交互模块自主执行这些步骤:
-
打开 deepseek-r1:8b 模型给出的初始 URL(Google 搜索页面)。
-
从 To-Do list 执行顺序操作(例如,键入、单击、导航)。
-
使用 browser-use 分析当前网页的内容,并确定它是否满足步骤要求。
-
继续执行下一步,直到完成所有任务。
每个步骤都根据实时网页分析进行评估,以确保准确执行。如果无法完成某个步骤,代理会尝试纠正措施或记录错误。
参考:
-
Playwright : https://github.com/microsoft/playwright
-
Browser-Use: https://github.com/browser-use/browser-use
Step3: Generate the Result Summary
完成 To-Do list 中的所有任务后,提取的内容将发送到 DeepSeek LLM 进行总结。发送到 LLM 的最终验证提示:
The result content is: .
Can this content fulfill the user's goal to Google search DeepSeek and summarize its product features in 300 words?
最终输出包括:
-
提取的内容摘要。
-
DeepSeek 对结果准确性的验证。
-
用于进一步评估的存档测试结果。
可以进一步扩展此代理,以支持不同的云或本地 AI 模型、自定义浏览自动化以及基于用户定义的场景的多步骤推理任务。
Environment Introduction and Setup
Environment Over View
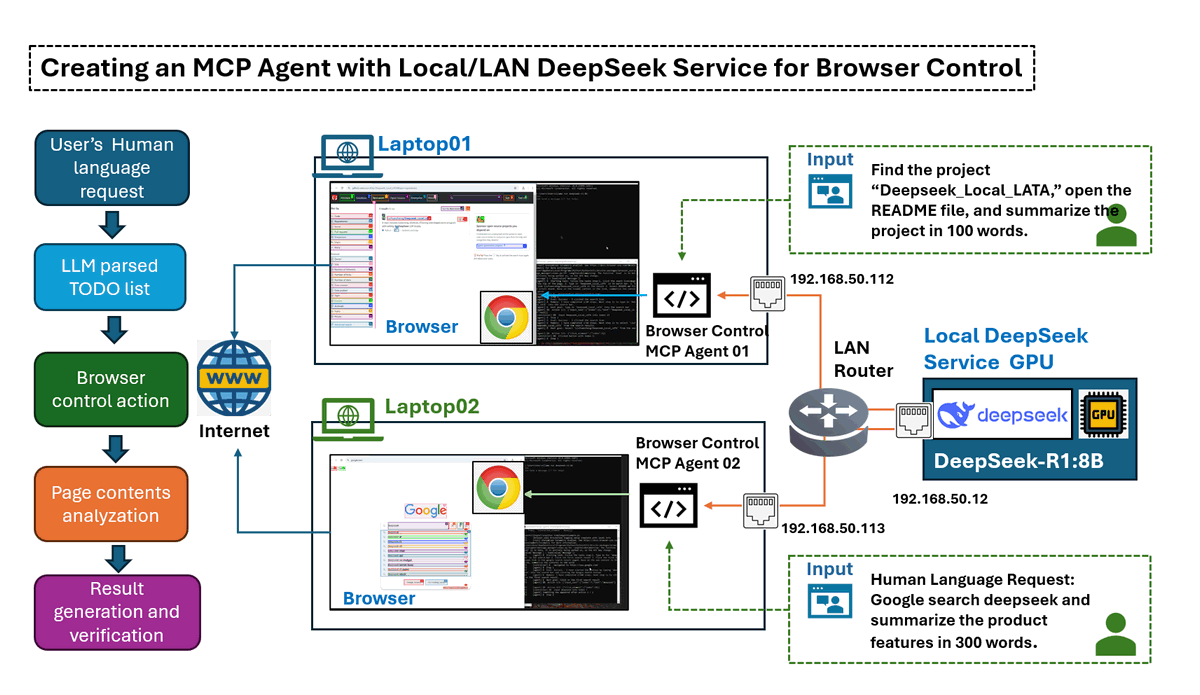
在此测试环境设置中,我们配置了一个局域网 (LAN),其中至少包含两种类型的机器:
-
一台 GPU 驱动的服务器,用于托管 DeepSeek 服务。
-
多台标准笔记本电脑,用于运行浏览器控制代理。
AI 代理将负责控制笔记本电脑上的浏览器,网络拓扑如下图所示:
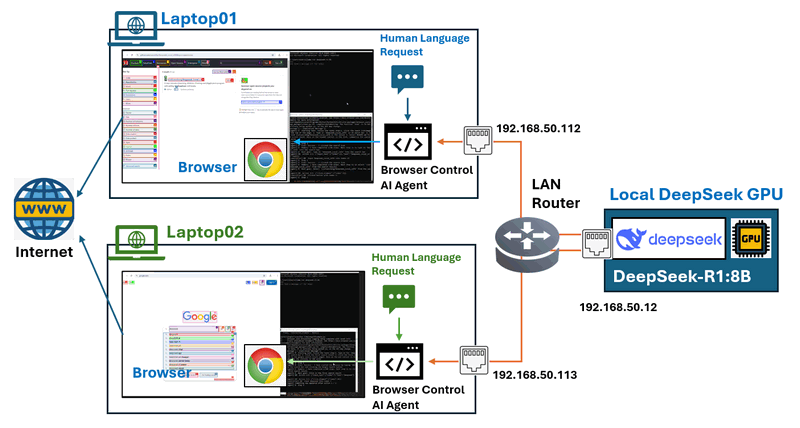
Figure-05: Test environment network connection configuration, version v_0.0.1 (2025)
要建立此环境,我们需要执行以下设置,配置如下所示:
-
在 GPU 服务器上部署 DeepSeek 服务。
-
在笔记本电脑上安装和配置浏览器控制代理。
| VM name | IP address | Hardware spec | OS | Program | Human Language Requests |
|---|---|---|---|---|---|
| Local GPU server | 192.168.50.12 | Intel-i5, 32GB, RTX-3060 | Windows- 11 | Ollama [deepseek-r1:8b] | N.A |
| Laptop01 | 192.168.50.112 | Intel-i5, 16GB, RTX-1060 | Windows- 11 | Browser Control Agent | Google search deepseek and summarize the product features in 300 words. |
| Laptop02 | 192.168.50.113 | Intel-i5, 16GB, Intel UHD GPU | Windows- 11 | Browser Control Agent | Find the project "Deepseek_Local_LATA" and open the readme file, summarize the project in 100 words. |
Setting Up the DeepSeek Service on the GPU Node
GPU 服务器需要使用 Ollama 运行 DeepSeek-R,并将服务连接公开给 LAN 节点。
Step 1 : Install Ollama LLM Service
从官方网站下载 Ollama:https://ollama.com/download,然后选择适合您操作系统的软件包并安装它。
Step 2 Download and Run DeepSeek-R
由于我们的 GPU 服务器具有 RTX 3060 (12GB),因此我们使用 8B 模型。运行以下命令以下载并启动 DeepSeek-R1:8b 模型:
ollama run deepseek-r1:8b
要检查您的 GPU 节点可以运行的最大 deepseek 模型,您可以参考此链接:https://www.linkedin.com/pulse/deploying-deepseek-r1-locally-custom-rag-knowledge-data-yuancheng-liu-uzxwc
Step 3: Expose DeepSeek Service to LAN
在 Mac 上设置环境变量
如果 Ollama 作为 macOS 应用程序运行,则应使用 launchctl 设置环境变量:
-
对于每个环境变量,调用
launchctl setenv。
launchctl setenv OLLAMA_HOST "0.0.0.0:11434"
-
重新启动 Ollama 应用程序。
在 Linux 上设置环境变量
如果 Ollama 作为 systemd 服务运行,则应使用 systemctl 设置环境变量:
-
通过调用
systemctl edit ollama.service编辑 systemd 服务。这将打开一个编辑器。 -
对于每个环境变量,在
[Service]部分下添加一行Environment:[Service]
Environment="OLLAMA_HOST=0.0.0.0:11434" -
保存并退出。
-
重新加载
systemd并重新启动 Ollama:systemctl daemon-reload
systemctl restart ollama
在 Windows 上设置环境变量
在 Windows 上,Ollama 继承您的用户和系统环境变量。
-
首先通过单击任务栏中的 Ollama 来退出 Ollama。
-
启动“设置”(Windows 11) 或“控制面板”(Windows 10) 应用程序,然后搜索环境变量。
-
单击编辑帐户的环境变量。
-
为您的用户帐户编辑或创建一个新的
OLLAMA_HOST变量,将其值设置为0.0.0.0 -
单击“确定/应用”以保存。
-
从 Windows“开始”菜单启动 Ollama 应用程序。
参考:https://github.com/ollama/ollama/blob/main/docs/faq.md#how-do-i-configure-ollama-server
Configure the Agent on Operation Node
节点 GPU 节点已准备就绪,我们需要配置每个操作节点笔记本电脑。操作节点需要:一个现代 Web 浏览器、Python 3.11 或更高版本、已安装的必需 Python 库。
Step 1 : Install Required Python Libraries
安装 Ollama 和 LangChain 支持:
pip install ollama
pip install langchain-ollama
安装 browser-use 自动化库:
pip install browser-use
安装 Playwright 以进行浏览器控制:
playwright install
Step 2: Configure Agent Parameters
每台笔记本电脑都运行一个与 DeepSeek 交互的浏览器控制代理,将文件 dsBrowserCtrlAgent.py 、 dsBrowserCtrlConfig.txt 和 ConfigLoader.py 下载到操作节点。
根据 GPU 节点和正在运行的模型设置 deepseek 服务配置 dsBrowserCtrlConfig.txt:
# This is the config file template for the module
# Setup the parameters with below format (every line follow : format, the
# key can not be changed):
#-----------------------------------------------------------------------------
# GPU node IP address which provide the ollama service.
OLLAMA_HOST_IP:192.168.50.12
#-----------------------------------------------------------------------------
# The deepseek model name we want to use.
DP_MODEL_NAME:deepseek-r1:8b
#-----------------------------------------------------------------------------
# The deepseek CTX number name we want to use, # for deepseek-r1:7b and 8b use
# 6000, for higher model use 32000
NUM_CTX:6000
然后将请求添加到 USER_REQUEST 参数,如下所示,然后启动:
#-----------------------------------------------------------------------------
# the user request string such as Use google search 'deepseek', go to its web
# and summarize the web contents in 100 words
USER_REQUEST:Use google search 'deepseek', go to its web and summarize the web contents in 100 words
Step 3: Run the MCP Agent
然后使用以下命令执行代理并收集结果。
python dsBrowserCtrlAgent.py
代理将连接到运行 DeepSeek-R1 的 GPU 服务器,执行浏览器交互(例如,搜索、单击、总结),并根据请求返回处理后的输出。
代码链接:https://github.com/LiuYuancheng/Deepseek_Local_LATA/tree/main/Application/BrowserAgent
Test Result Summary and Conclusion
在评估期间,我们测试了四种不同的 DeepSeek 模型大小,以分析它们对任务完成和执行速度的影响。该测试涉及执行一系列基于浏览器的任务,包括搜索特定项目、选择相关链接、阅读内容和总结信息。
以下是场景 2 的任务结果:
| Function \ Deepseek model | deepseek-r1:1.5b | deepseek-r1:7b | deepseek-r1:8b | deepseek-r1:14b |
|---|---|---|---|---|
| Generate Todo List | Finished | Finished | Finished | Finished |
| 1. Click the search icon(magnifier) at the top of the page. | Finished | Finished | Finished | Finished |
| 2. Type in 'Deepseek_Local_LATA' in th search bar. | Failed | Finished | Finished | Finished |
| 3. Select the link Deepseek_Local_LATA in the result | Failed | Finished | Finished | Finished |
| 4. Select README.md file link and scroll down | Failed | Failed | Finished | Finished |
| 5. Base on the readme content in the link, summarize the contents in 100 words | Failed | Failed | Finished | Finished |
在测试期间,有一些观察结果:
-
基本任务完成:所有模型,包括最小的模型 (1.5B),都成功执行了简单的操作,例如生成待办事项列表和单击搜索图标。
-
搜索和导航:低于 7B 的模型难以执行关键字搜索和选择相关链接。
-
内容处理:需要至少 8B 才能有效地读取和总结 README 文件。
-
性能扩展:14B 模型表现出卓越的性能,成功完成了所有任务,并确保了更好的执行速度和准确性。
结论 :
测试结果表明,模型大小对任务成功率和执行效率有显著影响。8B model 是基本浏览任务的最低可行选择,而大于 14B 的模型建议用于处理更复杂、多步骤的过程,具有更高的准确性和可靠性。
这种设计确保了一种结构化、自动化和准确的方法,用于使用 MCP 驱动的 AI 代理执行基于浏览器的任务。通过集成本地 DeepSeek LLM 处理,用户可以受益于:
-
与基于云的解决方案相比,更低的延迟。
-
通过消除对外部 API 的依赖,实现成本效益。
-
定制灵活性,用于定制的 AI 驱动的自动化。
对于寻求更高准确性和稳健执行的用户,建议投资更大的 DeepSeek 模型(14B 及以上),以最大限度地提高 AI 驱动的浏览器任务自动化中的性能和可靠性。
- Project GitHub Repo Link: https://github.com/LiuYuancheng/Deepseek_Local_LATA
- 如果您对其他 Deepseek-R1 本地部署和测试感兴趣,请参考:
- Deepseek test 01 : https://www.linkedin.com/pulse/deploying-deepseek-r1-locally-custom-rag-knowledge-data-yuancheng-liu-uzxwc
- Deepseek test 02 : https://www.linkedin.com/pulse/use-simple-web-wrapper-share-local-deep-seek-r1-model-yuancheng-liu-n7p6c
感谢您花时间查看文章详情,如果您有任何问题和建议或发现任何程序错误,请随时给我留言。非常感谢您能提供一些评论并分享任何改进建议,以便我们能够改进我们的工作~
last edit by LiuYuancheng ([email protected]) by 18/03/2025 if you have any problem, please send me a message.