
In Web 2.0 era, many websites will ask the user to upload their avatar when creating their profile. In HTML, the input control we should use is input="file". This is a file control provided by the browser vendor and it should be ran in a sandbox for security consideration. Browsers don't provide ways to choose file from local and upload to the remote server without the input="file" control.

There is one annoying part about the input="file", which is a default button named "Choose File" or "Browser" will always appear when this control is created. Sometimes, to keep consistent and provide better user experience, you may don't want to see the browse button. However, the browser itself doesn't provide an option to remove this button. In this post, we will provide a simple way to remove this button and put your own style for this control.
The rationale behind this is to set the opacity of this control to transparent and add an overlay above the file control. Let's take a look at an example. First, creating the HTML elements needed.
Below is CSS for the elements without the file control's opacity set to 0.
.avatar-zone{
	width:200px;
	height:200px;
	background-color:#CCCCCC;
}
.overlay-layer{
	width:200px;
	height:40px;
	position:absolute;
	margin-top:-40px;
	opacity:0.5;
	background-color:#000000;
	z-index:0;
	font-size:25px;
	color:#FFFFFF;
	text-align:center;
	line-height:40px;
}
.upload_btn{
	position:absolute;
	width:200px;
	height:40px;
	margin-top:-40px;
	z-index:10;
}
And here is what it looks like:
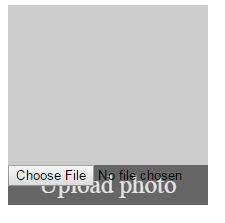
Now to remove the browse button, we add the CSS opacity:0. The HTML code now lloks like:
.avatar-zone{
	width:200px;
	height:200px;
	background-color:#CCCCCC;
}
.overlay-layer{
	width:200px;
	height:40px;
	position:absolute;
	margin-top:-40px;
	opacity:0.5;
	background-color:#000000;
	z-index:0;
	font-size:25px;
	color:#FFFFFF;
	text-align:center;
	line-height:40px;
}
.upload_btn{
	position:absolute;
	width:200px;
	height:40px;
	margin-top:-40px;
	z-index:10;
	opacity:0;
}
And now here is what it looks like:

Now when you click on "Upload photo", the dialog for choosing the file will appear.
The key here is that we have create two components: one is the file control and the other is the overlay layer. The overlay layer will just lay above the file control by setting its z-index to a value greater than file control's z-index. This is to ensure that the file control is one clicked when the mouse clicks over the overlay area.

The file name doesn't show