If we want to build a system with user modules, Authentication and Authorization are something that we can never ignore, though they could be fuzzy to understand.
Authentication (from Greek: αá½θεντικÏŒς authentikos, “real, genuine”, from αá½θÎντης authentes, “author”) is the act of proving an assertion, such as the identity of a computer system user — from wiki
Authorization is the function of specifying access rights/privileges to resources, which is related to general information security and computer security, and to access control in particular. — from wiki
You can simply conclude into two points.
- Who are you? Authentication enables the users to login into the system correctly.
- What can you do? Authorization grants proper permissions to the users.
This article will decrypt Kubernetes Authentication and Authorization, hoping you will no longer be puzzled by the following questions.
- What are the users on Kubernetes?
- How to verify user identity?
- What is RBAC?
- How to setup RBAC for users?
Users in Kubernetes
As the Kubernetes gateway, APIServer is the entrance for users to access and manage resource objects. Every access request needs a visitor legitimacy check, including verification of identity and resource operation authority, etc., then returns the access result after passing a series of verifications.
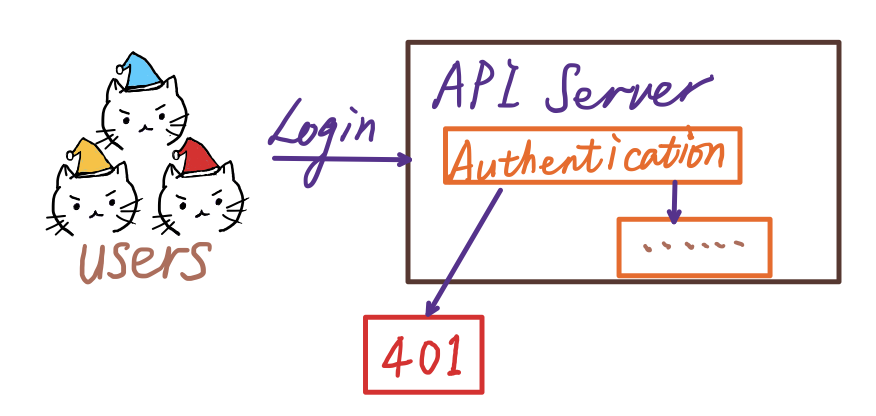
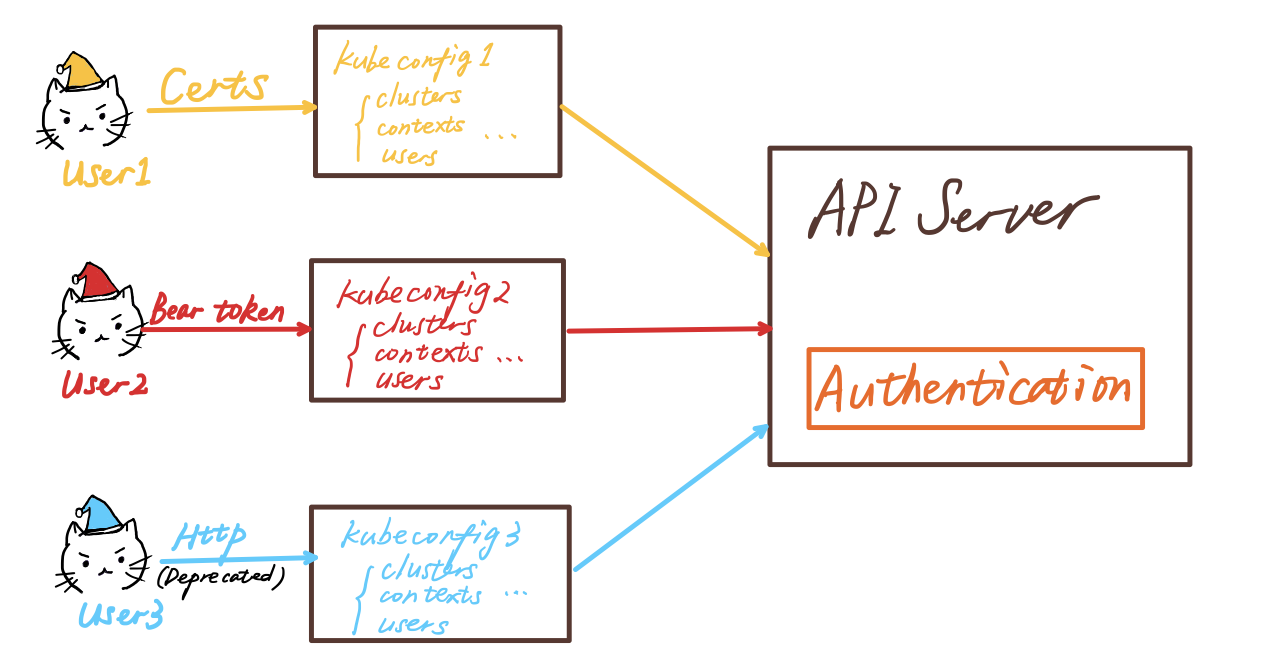
Users can access API through kubectl commands, SDK, or sending REST requests. User and Service Account are two different ways to access the API.
Ordinary Users
There is no built-in user resource type in Kubernetes that users cannot be stored in etcd, like how other resources are stored. Thus Kubernetes completes the authentication of ordinary users by client certs or other third-party user management systems, e.g., Google Account.
The key here is to find a secure way to help ordinary users access Kubernetes resources with kubectl or rest API.
There are couples of ways to authenticate an ordinary user:
- Client-side X509 Client Certs
- HTTP request
- Bearer token
X509 Client Certs
To set up a client-side cert using OpenSSL:
$ (umask 077;openssl genrsa -out testuser.key 2048)
Generating RSA private key, 2048 bit long modulus
………….+++
…+++
e is 65537 (0x10001)
# generate key O:cluster name CN: username
$ openssl req -new -key testuser.key -out testuser.csr -subj “/0=testcluster/CN=testuser”
# sign the cert
openssl x509 -req -in testuser.csr -CA ca.crt -CAkey ca.key -CAcreateserial -out testuser.crt -days 365
After generating the private keys, we now need to set the keys in the kubeconfig.
PS: Here, I used OpenSSL to generate credentials. You can also use cfssl. Official documentation here.
What’s kubeconfig?
The kubectl command supports all the above authentication methods. It uses a kubeconfig configuration file, which is often(default) stored in ~/.kube/config, to keep the communication method with APIServer and the data required for authentication.
The file mainly contains the following items.
- Clusters. The cluster list, including the URL to access the API Server and the cluster’s name to which it belongs.
- Users. User list, including user names and authentication information when accessing API Server.
- Contexts. Kubelet’s usable context list comprises of a specific user name in the user list and a particular cluster name in the cluster list.
- Current-context: The context name currently used by Kubelet is a specific item in the context list.
Next, add the created client certs to kubeconfig.
# set kube config
$ kubectl config set-cluster testcluster — kubeconfig=testuser — certificate-authority=ca.crt — embed-certs=true
# view cluster config
$ kubectl config view — kubeconfig=testuser
kubectl config set-cluster command is very important here, and we’ll use it in other solutions as well. here is the doc
The next step is to set client credentials.
$ kubectl config set-credentials testuser — client-certificate=testuser.crt — client-key=testuser.key — embed-certs=true — kubeconfig=testuserThe output of the kubeconfig is like this
apiVersion: v1
clusters:
- cluster:
    certificate-authority-data: DATA+OMITTED
  name: testcluster
contexts:
- context:
    cluster: testcluster
    user: testuser
  name: testuser@testcluster
current-context: ""
kind: Config
preferences: {}
users:
- name: testuser
  user:
    client-certificate-data: REDACTED
    client-key-data: REDACTED
The final step is using the context.
$ kubectl config use-context testuser@testcluster — kubeconfig=testuserTill now, You still can’t get anything because the authorization is not finished yet. I’ll show you how to grant permissions to the users in the section below.
Bearer token
Bearer token is a static token verify method, to enable which, you need to start APIServer with token-auth-file=authfile
The authfile format is like, password,user,uid,"group1,group2".Each line represents one user.
There are two ways to use Bearer token.
- Use HTTP header set
curl -X "POST" "https://{kubernetes API IP}:{kubernetes API Port}/api/v1/namespaces/{namespace}/serviceaccounts/{name}/token" \ -H 'Authorization: Bearer {bearer token}' \ -H 'Content-Type: application/json; charset=utf-8' -d $'{}'​ - Use kubeconfig
# set your token in the kubeconfig
$ kubectl config set-credentials NAME [-client-certificate=path/to/certfile] [-client-key=path/to/keyfile] [-token=bearer_token] [-username=basic_user] [-password=basic_password]
# use the context
$ kubectl config use-context NAME
For more about Bearer Token, check here.
HTTP Login
It’s basically a username and password login method. To enable it, you need to start the APIServer with basic-auth-file=authfile.
The authfile here is just like the one for Bearer token. Using it requires the HTTP client to add Authorization: Basic BASE64ENCODED(USER:PASSWORD) to the header to perform HTTP basic identity authentication. BASE64ENCODED(USER:PASSWORD) is USER:PASSWORD base64 value. After receiving, APIServer will judge whether the username and password are correct according to the authfile.
I won’t expand here since the HTTP login method was abandoned in 1.16 and removed in 1.19.
Normally, it is recommended to use client certs as admin login methods, and other users generally log in to access the cluster through the Cloud provider authentication method instead.
How does this actually happen?
The validation code is in kubectl.
- The first step is to find the auth params and build an env exec.
// https://github.com/kubernetes/kubectl/blob/d7ad7ff6ed3420b637b05a2023d105f6f7c11987/pkg/cmd/config/create_authinfo.go#L211 func (o *createAuthInfoOptions) modifyAuthInfo(existingAuthInfo clientcmdapi.AuthInfo) clientcmdapi.AuthInfo { var setToken, setBasic bool // where cert data is loaded if o.clientCertificate.Provided() { certPath := o.clientCertificate.Value() if o.embedCertData.Value() { modifiedAuthInfo.ClientCertificateData, _ = ioutil.ReadFile(certPath) modifiedAuthInfo.ClientCertificate = "" } else { certPath, _ = filepath.Abs(certPath) modifiedAuthInfo.ClientCertificate = certPath if len(modifiedAuthInfo.ClientCertificate) > 0 { modifiedAuthInfo.ClientCertificateData = nil } } } ... // bearer token if o.token.Provided() { modifiedAuthInfo.Token = o.token.Value() setToken = len(modifiedAuthInfo.Token) > 0 } // http login if o.username.Provided() { modifiedAuthInfo.Username = o.username.Value() setBasic = setBasic || len(modifiedAuthInfo.Username) > 0 } if o.password.Provided() { modifiedAuthInfo.Password = o.password.Value() setBasic = setBasic || len(modifiedAuthInfo.Password) > 0 } if o.authProvider.Provided() { ... } // load all the things into modifiedAuthInfo.Exec ... if o.execAPIVersion.Provided() { modifiedAuthInfo.Exec.APIVersion = o.execAPIVersion.Value() } ... if o.execEnv != nil { newEnv := []clientcmdapi.ExecEnvVar{} for newEnvName, newEnvValue := range o.execEnv { needToCreate := true for i := 0; i < len(modifiedAuthInfo.Exec.Env); i++ { if modifiedAuthInfo.Exec.Env[i].Name == newEnvName { // update the existing value needToCreate = false modifiedAuthInfo.Exec.Env[i].Value = newEnvValue break } } if needToCreate { // create a new env value newEnv = append(newEnv, clientcmdapi.ExecEnvVar{Name: newEnvName, Value: newEnvValue}) } } modifiedAuthInfo.Exec.Env = append(modifiedAuthInfo.Exec.Env, newEnv...) } }​ - Then kubectl verifies all the token/key against the cluster using client-go API and makes sure users have the permissions.
// https://github.com/kubernetes/client-go/blob/0964d4be7536bb9f7fae6bb71fbe763942cd2592/tools/clientcmd/config.go#L170
func ModifyConfig(configAccess ConfigAccess, newConfig clientcmdapi.Config, relativizePaths bool) error {
...
for key, authInfo := range newConfig.AuthInfos {
	startingAuthInfo, exists := startingConfig.AuthInfos[key]
	if !reflect.DeepEqual(authInfo, startingAuthInfo) || !exists {
		destinationFile := authInfo.LocationOfOrigin
	if len(destinationFile) == 0 {
		destinationFile = configAccess.GetDefaultFilename()
	}

	configToWrite, err := getConfigFromFile(destinationFile)
	if err != nil {
		return err
	}
	t := *authInfo
	configToWrite.AuthInfos[key] = &t
	configToWrite.AuthInfos[key].LocationOfOrigin = destinationFile
	if relativizePaths {
		if err := RelativizeAuthInfoLocalPaths(configToWrite.AuthInfos[key]); err != nil {
			return err
		}
	}

	if err := WriteToFile(*configToWrite, destinationFile); err != nil {
		return err
	}
}
}
  ...
}​
Service Account
Service Account, different from the ordinary users, is one of the resources managed by Kubernetes. It can be created via API, contains a set of secrets, is stored in etcd, and is usually assigned to a namespace.
- Service Account is managed by Kubernetes API.
- Service Account applies to applications (pods) running inside the cluster.
- Service Account accesses API through bearer token authentication. It is very easy to set up a Service Account through YAML.
apiVersion: v1
kind: ServiceAccount
metadata:
  name: test
namespace: kube-systemAuthorization
Authorization defines what you can do after login.
In traditional web systems, user management has three major parts, User, Role, Permission, which are stored in relational databases, and between which there are many-to-many mappings.
It is the same in Kubernetes, but a change in the terms. Now people use ServiceAccount, Role, Rolebinding in the Cloud world, and all these stored in etcd. So I believe it’s safe to say, Kubernetes’ authorization is not that hard to understand.
But if you think Kubernetes is “beating a dead horse”, then you are wrong. RBAC (Role-Based Access Control) is the Kubernetes authorization mechanism, and you can tell there is a switch from user-oriented to role-oriented from its name.

In Kubernetes architecture, one of the biggest advantages is the decoupling of different resources. Every resource type is independent, and they only communicate via APIServer. So API objects for different resources such as /pod/create, /service/create have become the new type of permissions, which are the real asset here.
Then it’s the developers’ job to organize all the APIs, assign them into different roles, and finally grant all these roles to ServiceAccount(user) using RoleBinding.
People believe that Kubernetes’ plugin resources design brings significant advantages.
- It brings flexibility to the whole Kubernetes ecosystem, being able to add new resources without compromising its original authorization mechanism.
- It decouples the fragmented relationship between permissions and users, centralizing in creating a role character.
We’ll continue the introduction of RBAC below.
RBAC
RBAC belongs to rbac.authorization.k8s.io API Group, which became beta in 1.6 and went GA in 1.8, and had brought great security improvement to Kubernetes back then.
You need to set -authorization-mode=Node,RBAC in APIServer configuration to enable dynamic RBAC function.
Kubernetes uses namespace to add separation in resource ownership, except for cluster-wide resources. So RBAC also split into two scopes, cluster-wide and namespace-wide. Furthermore, non-resources in Kubernetes that do not support namespace can only be set up cluster-wide, such as /heathz.
ClusterRole and ClusterRolebinding are used for cluster-level resources. On the other hand, Role and Rolebinding correspond to resources in the namespace.
There are four major ingredients in a Rolebinding/ClusterRoleBinding
- API resources
- API groups
- Subjects
- Verbs
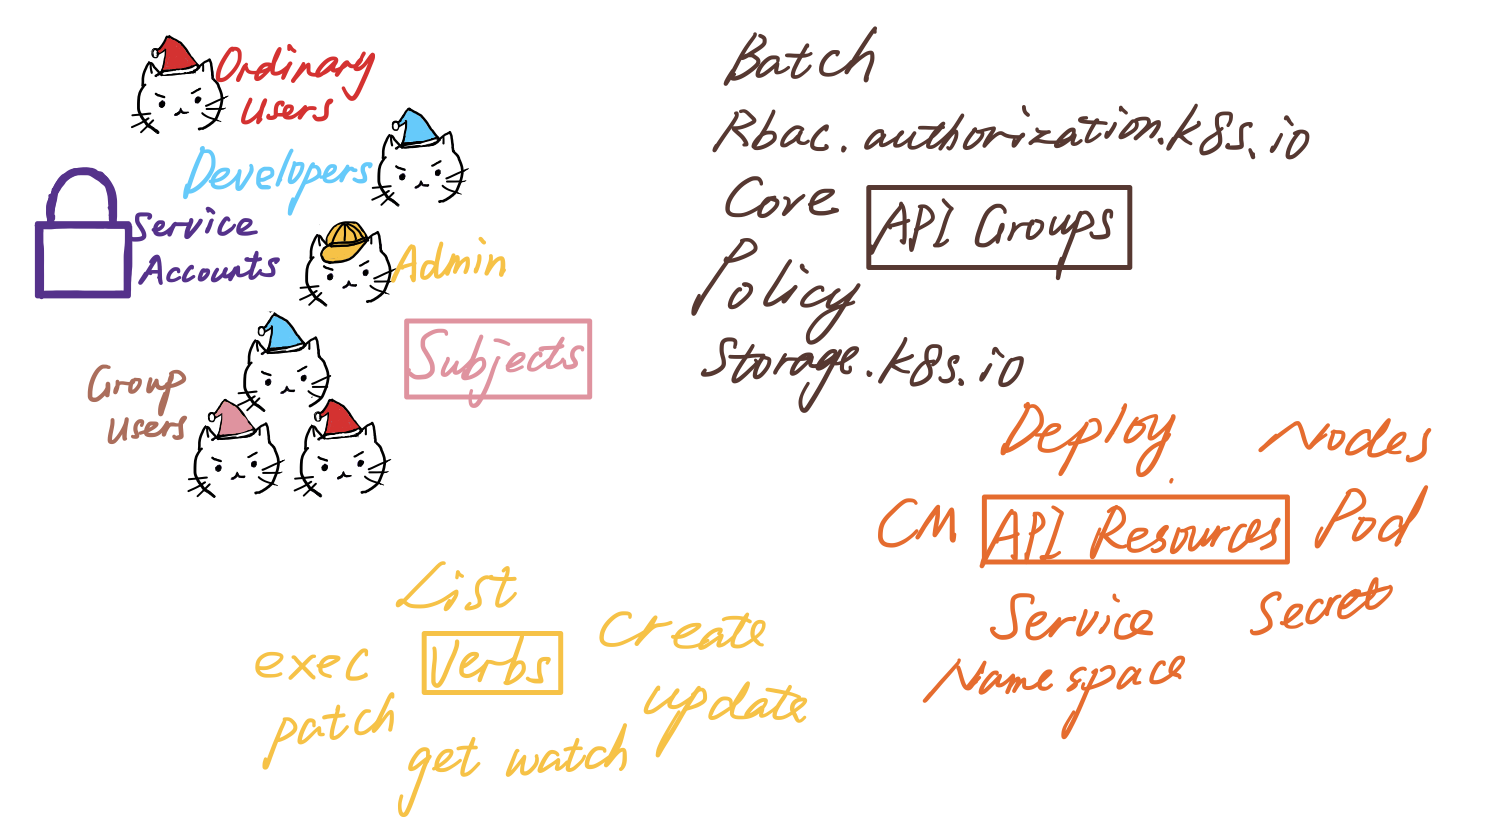
Kubernetes put granular API resources together into all kinds of API groups. For example, Deployment belongs to apps, while Cronjob belongs to the batch group.
You can simply find the information in its YAML by run the following command:
kubectl create namespace test --dry-run -o yaml | catThe output:
# kubectl create namespace test --dry-run -o yaml | cat
apiVersion: apps/v1   # apps is the API group
kind: Deployment
metadata:
  creationTimestamp: null
  labels:
    app: test
  name: test
spec:
  replicas: 1
  selector:
Let’s try configuring a Role for Pod and a ClusterRole for events, either of which only has some read permissions.
apiVersion: rbac.authorization.k8s.io/v1
kind: Role
metadata:
  namespace: test
  name: podreader
rules:
- apiGroups: [""] # "" indicates the core API group
  resources: ["pods"]
  verbs: ["get", "watch", "list"]
---
apiVersion: rbac.authorization.k8s.io/v1
kind: ClusterRole
metadata:
  name: event-reader
rules:
- apiGroups:
  - ""
  resources:
  - events
  verbs:
  - get
  - list
  - watch
It is quite easy to understand that both Role and ClusterRole need three major elements to build a rule, ApiGroup, resources, and verbs. Here we only add Pod as an example. And you can add different types in APIGroupsto the same rule if you want them to have the same permissions. Of course, you can separate them into different rules.
Among the multiple types of users mentioned in the image, I recommend the ServiceAccount approach, so this article focuses on that approach. However, for completeness, the article briefly describes the alternative approaches.
Now, let’s define a RoleBinding to combineServiceAccount with Role, and for ClusterRole, it is ClusterRoleBinding. This determines what a ServiceAccount(user) can do.
apiVersion: rbac.authorization.k8s.io/v1
kind: RoleBinding
metadata:
  name: podreader
  namespace: test # this need to match the Role's namespace
subjects:
# You can specify more than one "subject"
- kind: ServiceAccount
  name: default
  namespace: test
- kind: User  # use User
  name: testuser
roleRef:
  # "roleRef" specifies the binding to a Role / ClusterRole
  kind: Role
  name: podreader # this must match the name of the Role you wish to bind to
  apiGroup: rbac.authorization.k8s.io
---
apiVersion: rbac.authorization.k8s.io/v1
kind: ClusterRoleBinding
metadata:
  name: eventreader
subjects:
- kind: ServiceAccount
  name: default
  namespace: test
roleRef:
  apiGroup: rbac.authorization.k8s.io
  kind: ClusterRole
  name: eventreader # this must match the name of the ClusterRole you wish to bind to
The example binds the ServiceAccount name default in the test namespace and testuser (we defined in the User section using client-side certs) to a Role and a ClusterRole, so the ServiceAccount can read pod information in the test namespace and events for the whole cluster.
Aggregated ClusterRole
A new function was introduced in v1.9 for Aggregating ClusterRole (GA in v1.11).
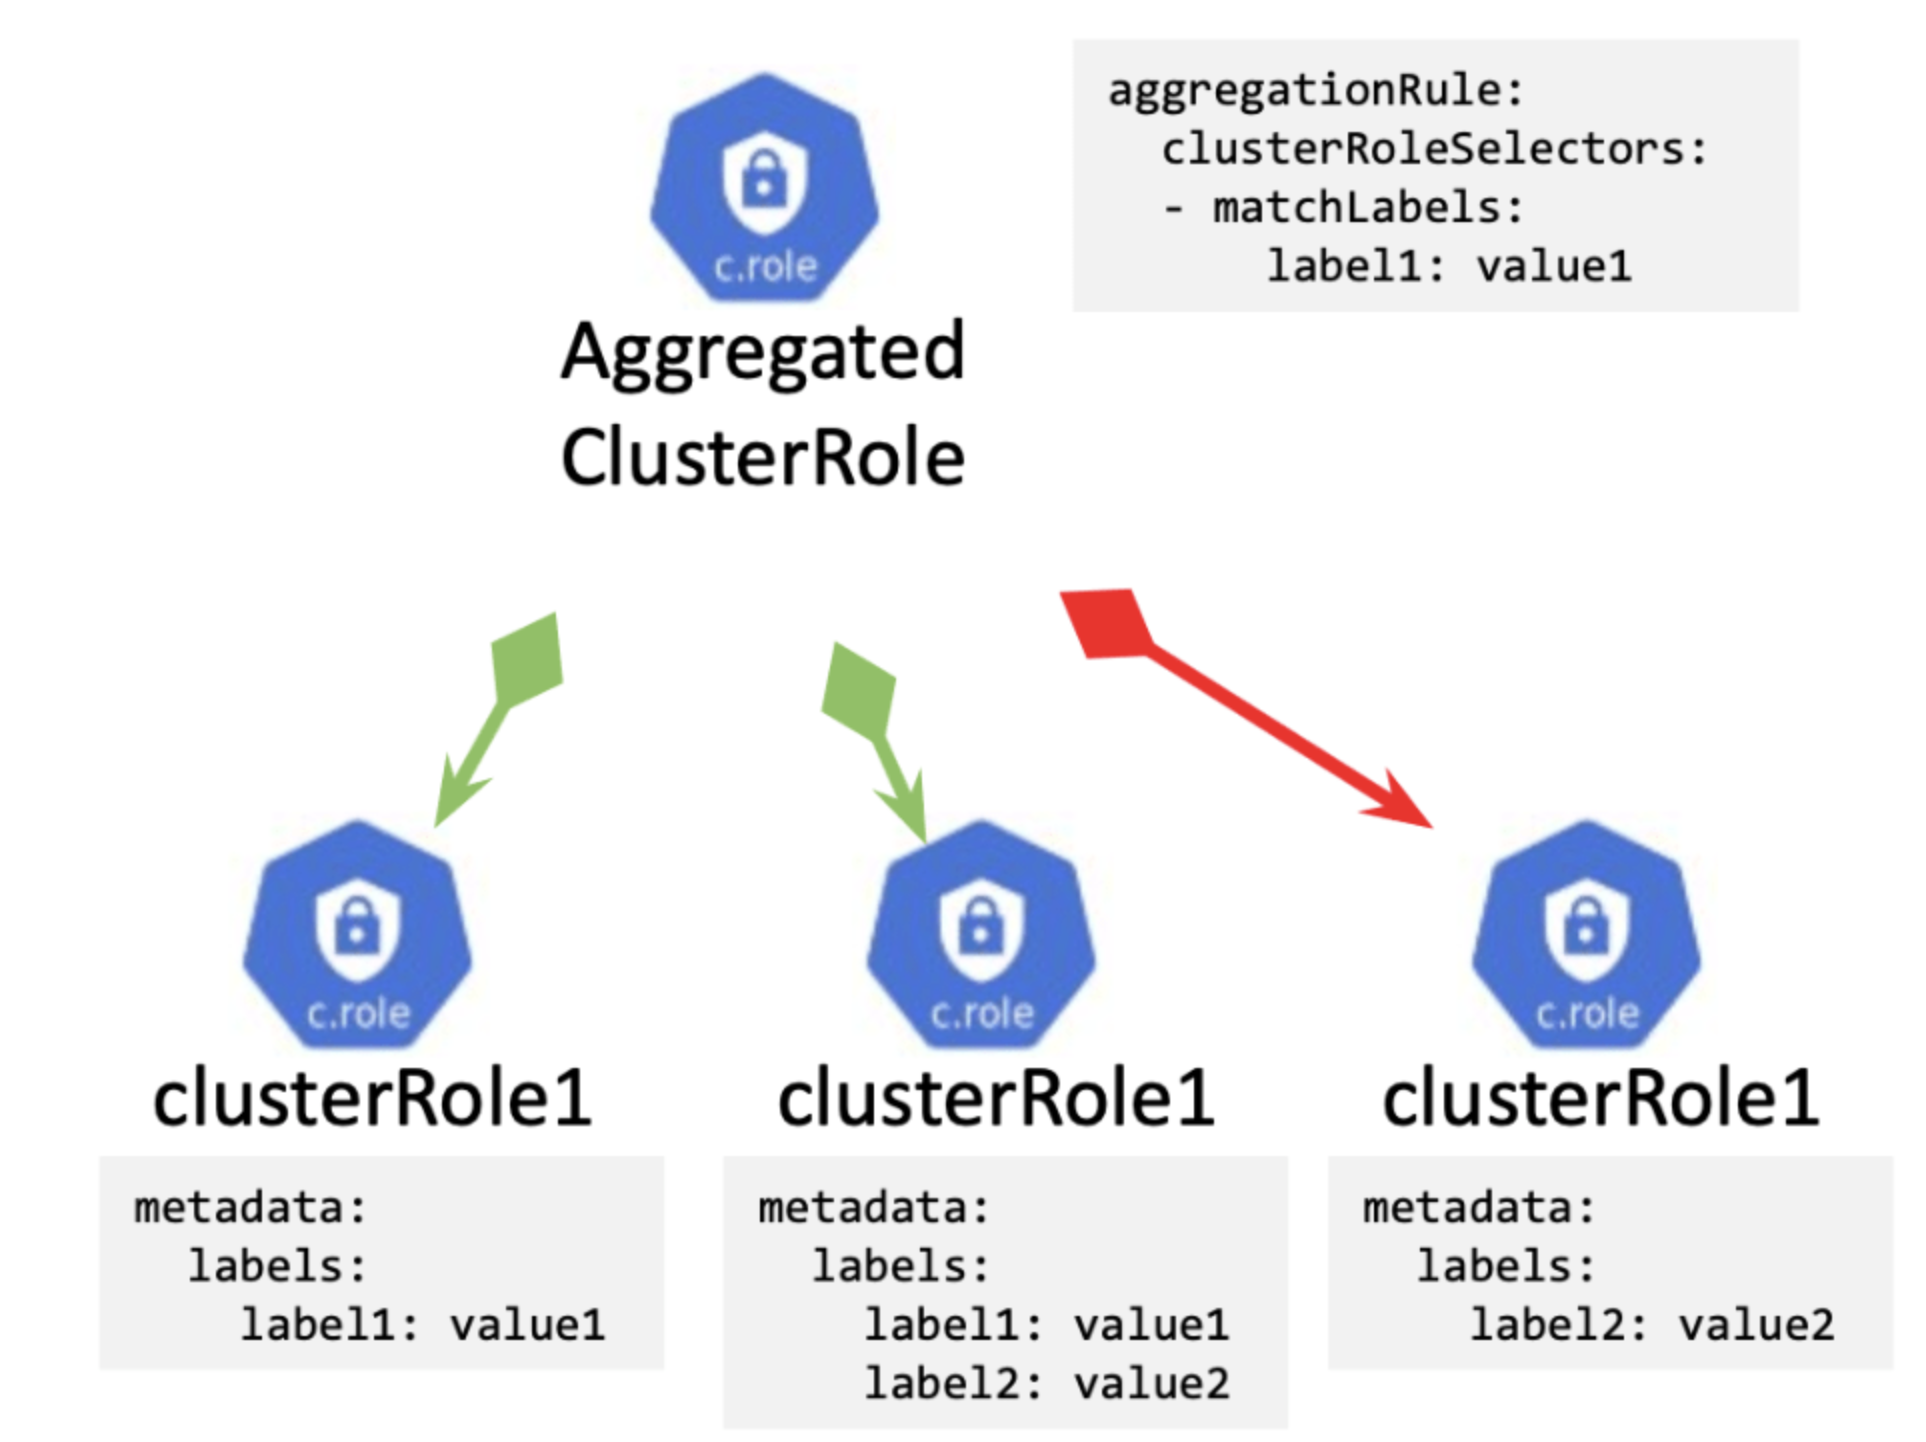
The configuration is as follows.
kind: ClusterRole
apiVersion: rbac.authorization.k8s.io/v1
metadata:
  name: creation
aggregationRule:
  clusterRoleSelectors:
  - matchLabels:
      rbac.example.com/create-cm: "true"
      rbac.example.com/create-secret: "true"
rules: [] # Rules are automatically filled in by the controller manager.
---
apiVersion: rbac.authorization.k8s.io/v1
kind: ClusterRole
metadata:
  name: create-cm
  labels:
    rbac.example.com/create-cm: "true"
rules:
  - apiGroups: "*"
    resources: ["configmap"]
    verbs: ["create"]
---
apiVersion: rbac.authorization.k8s.io/v1
kind: ClusterRole
metadata:
  name: create-secret
  labels:
    rbac.example.com/create-secret: "true"
rules:
  - apiGroups: "*"
    resources: ["secret"]
    verbs: ["create"]
---
This is basically a simplified configuration, allowing users to group similar ClusterRoles together and then match them with other ServiceAccount through an Aggregated ClusterRole. That is really a “nice to have” functionality!
Embed ClusterRoles
Kubernetes already has many built-in ClusterRoles, and you can check ClusterRole in your kube-system namespace.
kubectl get clusterroles -namespace=kube-system
Anything starts with the system: is a built-in ClusterRole.
Webhook
There is also a special use case. If you use CRD, you can define an authorization webhook extension to verify its permission. Add a kubeconfig format like auth.yaml by adding the --authorization-webhook-config-file=auth.yaml flag.
If you want more information, please refer to Kubernetes RBAC official doc.
In Summary
The Authentication and Authorization of Kubernetes may be more complicated than we think, especially involving ordinary users’ login and Authorization. But ServiceAccount is an excellent design that allows us to manage permissions for Pod’s running programs with flexibility and security.
Resources like Pod, Deployment, ConfigMap, are always the core assets of Kubernetes, and everything works around them. We understand various resource operations and the APIServer design better when learning RBAC.
For application developers, understanding how to use RBAC is essential, especially for most users who use Kubernetes through various cloud providers(GKE, EKS). RBAC and cloud providers’ IAM management have similarities.
For the features and differences between GCP IAM and Kubernetes RBAC, please refer to GCP IAM Authentication & Authorization 101.
Thanks for reading!
Note: The post is authorized by original author to republish on our site. Original author is Stefanie Lai who is currently a Spotify engineer and lives in Stockholm, original post is published here.
